Possibly the new hardware you introduced is the cause if all of your cables are properly plugged in and your drivers are updated. Examine additional possible causes of the problem.
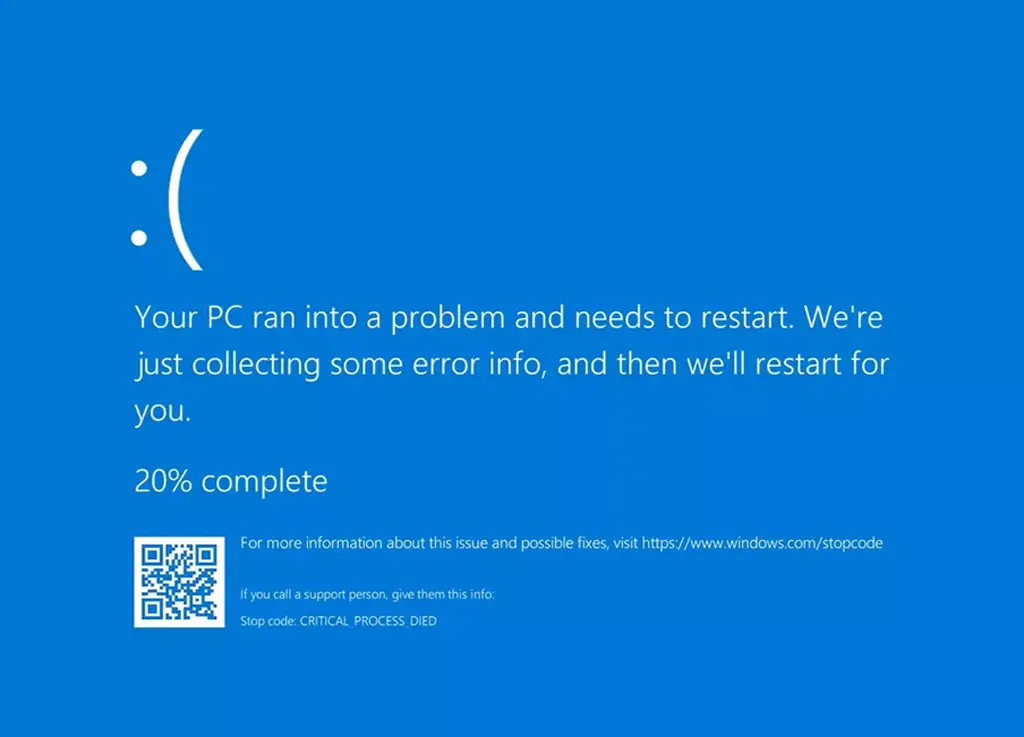
The STOP code Critical Process Died notice can be removed and its recurrence prevented by following the instructions in this article.
How to Repair the Critical Process Died Error
The best repairs for the Windows 11 Critical Process Died alert are mentioned below. It is best to tackle them in the order provided, since they run from the simplest and most efficient to the most complex and intensive.
Tip: To ensure that each fix was working, restart Windows 11 after attempting them.
- Examine the connections on the hardware. During startup, a loose cable may result in a Critical Process Died error. Verify that all of the cables including the USB cord, monitor, power cable, and others are fully inserted.
- Take off the new hardware. Sometimes, Windows 11 Critical Process Died error messages might be caused by connected devices. Turn your computer back on after shutting it down and unplugging all connected gadgets. The problem is probably with one of the deleted devices if you do not receive the error notice.
- Update your drivers. Verify that the drivers for your Windows 11 PC are up to date. Update the drivers for any devices you may have disconnected and reconnect right away.
- Upgrade Windows 11. Installing any necessary security upgrades and enhancing device stability can be achieved by running a Windows update. This can help to prevent crashes.
- Scan for malware and viruses. After verifying that you have installed the most recent Windows security updates, scan your device for viruses and malware and eliminate any that may have affected it.
Tip: You can attempt a few bootable antivirus programs if you are unable to access Windows in order to perform a virus scan.
- Update the apps and games on Windows. They probably triggered the problem if you experienced Windows 11 Critical Process Died while using an app or playing a game. Restart your computer, update any programs that were open when the incident occurred, and look for updates for any other games or apps.
- Eliminate Windows 11 temporary files. Running Disc Cleanup, removing temporary files, and emptying the Recycle Bin are a few tasks you can perform to speed up your computer and maybe lower the chance of a Windows 11 Critical Process Died crash.
- Clear some space. Clearing out your storage space may prevent the STOP code Critical Process Died problem message from happening, as it has been known to be caused by a lack of free space.
- Launch the Startup Repair. Open the Startup Repair tool from the Windows 11 Advanced Startup Options screen if you have not previously. Using this feature, your computer will automatically search for possible sources of the Critical Process Died issue and fix them.
- Utilize Windows debugging tools. Navigate to Settings and choose System > Troubleshoot to quickly look for any issues that any of the above mentioned procedures might have overlooked.
- Launch Command Prompt, then type the command sfc /scannow. This will start a procedure that looks for and fixes broken files on your Windows 11 machine automatically.
- Carry out a system restore. You can reverse the recent modifications with a system restore if you keep receiving the Windows 11 Critical Process Died error during startup and believe it was caused by a recent app or OS upgrade.
Note: A system restore could reverse some of your modified operating system and app settings and preferences, but it will not impact any stored files.
- Restart your Windows 11 computer. Try resetting your computer using the Reset This PC feature if all other options have failed. You have the option to either reinstall the critical system files and preserve all of your files, or erase everything and start over.
- Reinstall Windows 11. You can totally reinstall the Windows 11 operating system as a final option after attempting the aforementioned solutions. By doing this, your device is restored to its original state and everything is effectively erased.
The Critical Process Died STOP Code: What Is It?
The STOP Error message screen, often known as the Blue Screen of Death (BSOD), displays a number of error messages, among them the Critical Process Died STOP code.
The STOP Error screen takes up the entire display and typically comes with the statement “Your PC needs to restart due to an issue.” We will merely collect some error information before starting over for you.
The error message screen for the Critical Process Died STOP code cannot be closed like a normal Windows 11 error message. Usually, you have to wait for its operations to finish before your device restarts on its own.
Important: If a process appears to be active on the Blue Screen of Death (BSOD), do not attempt to restart or shut down your Windows 11 computer. Waiting for it to be completed before proceeding.
What Happens to Critical Process Died Errors?
Windows 11 Critical Process Died error messages typically appear as follows:
- Latest software or hardware
- A data conflict
- Insufficient space for free memory
The STOP code Critical Process Died error has also been found to be caused by malware and viruses.